Wednesday, September 27, 2023

Nautical Journals

 Welcome back for more inspiration. My projects for today are journals I created for the guys. The designer series paper and cut aparts are from the DCWV "Hello Sailor" pack. Each journal comes with a matching pen.


Trying to decide how many journals to make. Not sure how popular the will be. I will be making some for the ladies and a few for kids. Now to to decide on the papers and embellishments.

So glad you stopped by today. 

Terri

Tuesday, September 26, 2023

Jr. Legal Pads

Hello, everyone! I would like to share some things I have been working on in the hopes of doing some craft shows.


Some of my scraps were used to create the covers of these 3" x 5" notepads. The top two pads have cut aparts from a nautical sheet of paper and the bottom two pads were created with cut aparts from a floral sheet of paper and Tim Holtz die cuts.

Hopefully, I will be able to get a few more made before any shows.

Thanks for stopping by.

Terri

Tuesday, September 19, 2023

4 x 6 Acrylic Post It Note Frame

 Hello again.

Today, I have more acrylic frames to share with you. This time using 4" x 6" acrylic frames I created post it note holders for the ladies. I only have two to share today, but plan on making more.


I started with a piece of 4" x 6" floral paper from DCWV's Fairytale Floral pack and added a 3/4" x 4" strip of foiled paper from the same pack at the top. The pen has a 3/4" x 3" strip of the floral paper in the barrel. Last I added green grosgrain ribbon and the butterflies for decoration.

Now that my craft room is finished, except for a few things to put away, I have time to start crafting again. Love having a clean craft room to work in. Still have to mark what is stored in my cabinets, but for the most part, everything is where I can find it easily.

That's all I have for today.

Terri


Monday, September 18, 2023

5" x 7" Acrylic Frame Notepad Holders

 I have been very busy working on items to sell at craft shows or on Facebook. Today, I would like to share the Acrylic Frame designs.

The designer series paper is from Stampin' Ups "Well Suited" paper pack. This double sided paper was perfect for matching the main piece and the strip across the top. I cut a piece of paper 5" x 7" for the body of the frame and added a 3/4" by 5" strip at the top for accent. A 3/4" x 3" strip was place inside the pen match. Natural color twine was wrapped around the frame 3 times and tied in a knot. 

I have included 3 more photos using other papers from this pack.


Wouldn't one of these frames make wonderful gift for a special gentleman's desk? The notepad is held on with glue dots and can be easily replaced with any 3" x 5" notepad.

Thanks for stopping by to visit with me. Comments are always welcome.

Until next time,

Terri


Sunday, April 2, 2023

Back to Crafting

Hello everyone! 

Due to some health issues, I haven't been able to get into my craft room for some playtime. In June of this year, I was diagnosed with stage 1 breast cancer. I went into surgery on July 20th (my husband's birthday) to have a 1.5 centimeter mass and 1 lymph node removed.  Then back into surgery on August 17th to have some additional cells removed. I was unable to do any lifting or repetitive movements with my arm for 8 weeks. In October I began radiation therapy 5 days a week for 4 weeks. Thankfully, my treatments were finished the first week of November and I was able to enjoy the holidays.

I am now on Anastrozole for 5 years (1 pill a day) to prevent a recurrence. I feel so blessed with my doctors, radiation team, family and friends who kept me in their prayers, sent cards and called to check up on my husband and I.

I have two cards to share with you today. 

The first card is a sympathy card using a white card stock base 5 1/2 by 4 1/4. The flowers in each corner were fussy cut from Recollections Fairytale Designer paper and I added another layer with dimensions. The sentiment is from a stamp set I have had for quite awhile by Alinacutles.Last I added 3 pink pearls around the sentiment. I also added a flower to the bottom right corner of the card inside.

The second card is a get well card using pink dsp. (Sorry, I don't know what paper this is. It was some leftovers from another project.) Added a tag frame from Bloom Street Pink Paisley ephemera to the left side of the card, then added the bouquet of flowers from the same pack using dimensionals for a 3D effect. I created the flag using a dark green card stock and layered the stamped sentiment on top. White pearls were added around the sentiment panel and a strip of the pink paper was added to the bottom of the inside. The sentiment on the inside reads "Get Well Soon."


 I hope you enjoyed my cards for today. Looking forward to more time in my craft room.

Thanks for stopping by. I would love to see your comments about my creations.

Have a great day!

Hugs,

Terri 

Wednesday, July 20, 2022

Sending Thoughts

I am thrilled to announce that I am now a member of the Love to Scrap Challenge Blog design team.

Due to some health issues with my husband, I have not been able to craft as much as I would like. Now I am back and ready to share my projects with you.

My project for this month is a card I created using pieces from a kit that came with a paper crafting magazine I purchased a couple of months ago. 


I chose the light green leaf paper to create the background. Next I cut the flower print paper into triangles for the corners. I matted the topper to a piece of red card stock and fussy cut around the edges to create a frame.

I hope you will stop by the Love to Scrap Challenge Blog and join in the fun.

Until next time,

Terri


Thursday, September 2, 2021

Best of the Bunch

 Hello everyone! So glad you stopped by today.

What a week this has been. Due to major thunderstorms caused by Hurricane Ida, we lost tv and internet service for a few days. Thankfully, everything is back up and running today. Didn't know if I would be able to write this post and share my project for the new challenge at the Stinkin' Inkers beginning today.

I am very pleased with the way this card turned out.


The base is a 5 1/2"  x 11" piece of apple green card stock scored at 1 1/4", 4" and 6 3/4".  Then I added a panel of green gingham, green striped, gre "en/white dotted designer paper and white cardstock to the panels.

Using my Spellbinders scalloped circle I created the mat for the apples and stamped the sentiment with black ink. All the apples were created using my Stamps of Life apple dies that coordinate with the "Apple2Stamp" set found here.

The sentiment inside reads "You are the Best of the Bunch." This is my inspiration project for the Stinkin' Inkers challenge theme: Pick Me Up.

I can think of quite a few people who could use some cheering up after this past year dealing with Covid. Thankfully, my family have avoided this terrible virus.

Hope you all are doing well and will head over to the Stinkin' Inkers to enter your projects in the challenge.

Have a great day!

Terri

Thursday, July 1, 2021

Something Fishy

Hello everyone! There is a new challenge beginning over at the Stinkin' Inkers today and the theme is:

 "Let the Sparks Fly"

The challenge is to use anything that sparkles on your project. My younger daughter took after her grandparents on both sides of the family and loves to fish. I thought this cute little fish from the Stamps of Life would be perfect for my card. You can find this stamp set here and the matching dies here.


I haven't added a sentiment because I'm not sure what I will use this card for. Could be a birthday, retirement or thinking of you card for a special guy.

I started with a base of red card stock and folded it in half. Then I cut about 2" off the top of the card front. Sailing ship designer paper covers the top of the  inside of the card and I added a piece of white card stock to the bottom of the inside for a sentiment.

Next I added this pretty designer paper that I thought looks like waves to the front flap. The fish was stamped with black in onto a white card stock circle and colored with markers. The mat for the image is a scalloped die cut circle from gray card stock. Last I added the clear gems for bubbles. This was an easy, quick card to complete.

If you have time, stop by the Stinkin' Inkers and check out the inspiration projects by my team members.

While there, why not share your creativity with us?

Have a great day and Happy Crafting?

Hugs,

Terri

Thursday, May 6, 2021

Pulling for You

Hello everyone! What a year we have had. I hope you all are well and have escaped the dreaded Covid. I have received my first vaccination and will receive the second next week. Thankfully, my hubby and I have not been exposed to this virus.

Now on a happier note. Today begins a new challenge at at the Stinkin' Inkers Challenge blog. The theme is "Girls Just Wanna Have Fun". Create a project for a special lady or little girl.

Here is the card I created:


Starting with a base of white card stock, I sponged the sky with 2 shades of Distress Inks (I forgot to write down the colors). Next, I used a die to create the grass. then I stamped these 2 cute squirrel images from The Stamps of Life collection. Markers were used to color the images.

Why not head on over to the Stinkin' Inkers blog and join in on the fun? Also check out the challenge over at the Double Trouble blog. The Stinkin' Inkers is going to partner with Double Trouble beginning May 17th and ending May 30th and there will be 3 chances to win a prize by following their guidelines that coordinate with our theme.

The design team have created some beautiful inspiration projects to help get you started. 

Hope to see you there.

Terri


Thursday, April 1, 2021

Butterfly Birthday

Hello and welcome to my blog. I can't believe it is April already. The beginning of March we had beautiful weather with temperatures in the mid-60's to low 70's with lots of sunshine. Unfortunately, the forecast is calling for a high of 32 degrees with snow today. With any luck we will have warmer temps for Easter.

But enough of the weather. Today I would like to share by card that I created for the challenge at the Stinkin' Inkers. The theme for this month is:

Recycle/Reuse 


I started with a white base card and added this beautiful purple with white dot designer paper. Next I used my Nestibilities scallop circle and circle dies to create the frame for the butterfly. The butterfly was created using my fancy butterfly die on white card stock, then backed with a piece of scrap paper from another project amd adhered to the frame with a dimensional. The "Happy Birthday" was die cut from white card stock. To finish the card, I added a trip of border trim left over from a hand crafted mini album.

Why not stop by the Stinkin' Inkers Challenge Blog and join in on the fun? You have until 7pm Sunday April 25th to enter. There is a limit of 3 entries per person.

Have a wonderful day!

Hugs from Ohio,

Terri

Thursday, February 4, 2021

Hugs and Kisses

Hello everyone! So glad you decided to stop by today. I would like to share the card I made for the Stinkin' Inkers challenge.

The stamp set is from the Stamps of Life by Stephanie Bernard called "Heart Locket 2 Love" and can be found here.

I started with a base of light pink card stock and added a black mat. Next I stamped the keys with light and dark pink ink and added the panel to the black mat. The heart locket was stamped on pink card stock and "kissed" with a back ground stamp and cut out with a matching die. After adding the sentiment, I used pop dots to adhere the locket to the main panel. It is hard to see the kissed background in the picture. Tried everything, but I think the stamp was too detailed.

Don't forget to stop by the Stinkin' Inkers Challenge blog and join in on the fun. The design team created beautiful inspiration projects to get you started.

Have a great day!

Hugs,

Terri


Thursday, January 7, 2021

Happy New Year

Hello everyone! Thank you for stopping by. I am ready to begin this year on a positive note. 2020 was a difficult year for all of us due to the Covid virus. Thankfully, my husband and I have stayed healthy and so has my family. The holidays were very nice, except that we didn't get to see our older daughter and her family. They didn't get the virus, but opted not to see everyone to be safe.

I hope all of you who celebrate a holiday (Christmas, Kwanzaa, Hannakuh, etc) had a blessed and safe time.

Today begins a new challenge at Stinkin' Inkers. The theme for January is:

"Make It Hot" 

I chose this image from Stamps of Life by Stephanie Barnard. I started with a base of red card stock, then stamped the cup image on Christmas Designer paper. The spoon was stamped on light blue card stock and the marshmallows on white card stock with brown ink. After die cutting all the images, I place a piece of brown card stock under the cup to look like hot cocoa, then added the sentiments on the front and inside with brown ink. The inside reads "is like a hug from the inside".


I hope you will stop by the Stinkin' Inkers challenge blog and join in the fun.

My design team has created some beautiful projects to give you inspiration for your own design.

Have a wonderful day.

Hugs,

Terri 

Thursday, November 5, 2020

Quilted with Love

 Hello and welcome to my blog. Today I would like to share my project for the next challenge at the Stinkin' Inkers.

The theme for November is "Quilting". How I would love to have one of my family's homemade quilts. My mother, aunts and grandmother would get together and hand sew quilts. The stitches were so small and perfectly aligned. Unfortunately none of them have survived the many washings.

So in memory of my family, I created this card:

Designer paper and teal card stock were cut into 1" x 1" squares and adhered onto a white card stock base in a quilt pattern. Next the card front was embossed with this beautiful pattern. Prima paper flowers were added to the top left corner and then a pearl spray was adhered under the sentiment panel.

 Thank you for stopping by today. If you have a chance, hop on over to the Stinkin' Inkers challenge blog for more inspiration from the Design Team and enter your own creation.

Have a great day!

Terri

Thursday, September 3, 2020

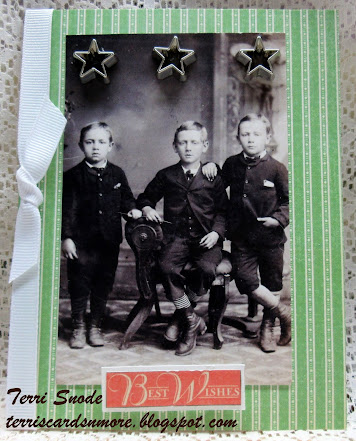
Three Boys

The challenge at the Stinkin' Inkers this month is "Times 3". I found this Tim Holtz vintage photo in my stash and knew it would be perfect for this theme.


 The base is white card stock with a of mint green striped designer paper mat. 

Next I added the photo and 3 silver stars and the sentiment mounted on white card stock. Last I added  white grosgrain ribbon tied in a knot. Once I have decided what occasion this card fits, I will add a sentiment on the inside. 

Thanks for stopping by and visiting with me today. If you have a chance, head over to the Stinkin' Inkers and join in on the fun. 

Monday, June 1, 2020

Hello

I hope you had a great weekend. I have another card to share with you today. Recently, I purchased the new Diamond Press Mini embossing and die cutting machine with stamp set and dies from HSN. I couldn't wait to try it out.

So here is my first project.
The base card is white card stock. Using a piece of paper from the DCWV Floral Foliage paper pad, I used the frame die to cut a light pink panel. The "Hello" was cut using a die from the bundle as were the flowers. I used tape runner to adhere the yellow/pink flower and ivory stems. Then the pink/yellow flower and butterfly were adhered with pop up dots. The antennae for the butterfly was created by cutting apart a floral wedding pick. The leaves were attached to the flowers before adhering to the card. The purple ribbon is from Really Reasonable Ribbon.

When I ordered my Diamond Press, I also signed up for auto ship and will receive 6 more stamp/die bundles which will be shipped bi-monthly.

I am really having fun with this bundle. Hope you like my project and will stop by again.

Hugs,
Terri

Thursday, May 7, 2020

Bag It!

Hello, everyone! Today I would like to share my project for the challenge at the Stinkin' Inkers. The theme is "In The Bag". Create a bag, tote, purse or other project using one of these as your focal point.

I know I found a tutorial on Pinterest for this bag made from a 12 x 12 sheet of paper, unfortunately I forgot to save it to my board. However, there are a lot of other bag tutorials to choose from on youtube.


I chose this piece of red/white designer paper for the body of the bag and a strip of red for the top. Using a 1/4" punch I created 2 holes for the gold ribbon. Very easy project.

Why not head on over to the Stinkin' Inkers and enter your project?

Have a great day!
Terri

Friday, May 1, 2020

Travel Escape

 Welcome back to my blog. Today's project is a masculine card.

The base started as a gate fold card, but folded forward to create a tent fold. Script designer paper was adhered to the inside and then the ship's wheel and checked designer paper was adhered to both panels of the gate fold. I also added a strip of the checked paper across the script paper and added blue/white twine to hold the tent fold up. The globe (from Stampin' Up's "the Ocean Sea" stamp set) is stamped in denim ink and matted with a blue scalloped circle. the sentiment is from the pad of designer paper and adhered to a tag with blue and white twine.

This card would be perfect for Birthday, Retirement, Graduation, etc. I definitely be using this fold for other cards.

Thanks for stopping and visiting with me today.

Hugs,
Terri 

Thursday, April 30, 2020

Small Masculine Note Pads

I would like to share some of the projects that I have been working on lately. Hoping to do some craft shows this fall if the corona virus doesn't cause cancellations.

My first project is some note pads for the guys. They are 3" x 5" and will have a pen included.


The designer paper used is from the "Explore" pad by Authentique Paper and the "Getaway" pad by Echo Park. The sentiment panels are also from these pads.

I cut a 6" x 3" strip from the designer paper, lined it up at the bottom of the pad and folded the extra over the top of the pad and glued it down to cover the glued portion and the back of the top. The gold grosgrain ribbon is from a roll I have had in my stash forever and the red ribbon is from the Really Reasonable Ribbon.

Please stop by tomorrow for a look at a card I created with these designer papers.

Hugs,
Terri


Thursday, March 5, 2020

Finally Back

Hello, everyone. It feels good to get back to crafting and blogging. 2019 was not a good year for my husband and I. Hubby went out for a walk (while I was at work),had a vertigo attack and fell and broke his left kneecap into 3 pieces. Thankfully, a neighbor and her husband were home, saw him and got him home. They tried to get him to go to the emergency room, but he wanted to wait for me.

Well, after 4 days in the hospital - one month in a community care facility and 2 operations, he finally came home. Then 6 months later, he had to have a third surgery because one of the wires had broken. After 10 1/2 months of no walking without a crutch or walker he has finally healed.

With all of that being said, I would like to share my project for the Stinkin' Inkers Challenge for this month. Our theme is "Pastel Pallette".

My mind was on spring when I decided on this theme. I can't wait till all the spring flowers begin to bloom and I can feel the warmth of the sun on my head.
To create this Z-fold card, I started with light pink card stock for the base and added a light teal mat under the pastel watercolor flower designer paper. Next I added the paper flowers, added white pearls to the center of each, stamped the inside flower with black ink and used markers to color in the image. This would be a beautiful card to let someone know you are thinking of them.

Thank you for stopping by today. If you are looking for a fun challenge, be sure to stop by the Stinkin' Inkers challenge blog and share your pastel creations with us.

Until next time,
Hugs,
Terri

Wednesday, August 14, 2019

Shine Bright

Once again it is my turn to host the challenge at the Sisterhood of Crafters. The theme for this challenge is:
"Die-namic" 
There are so many beautiful dies out there, so I would like to see how you use your dies to create a fabulous project.
I just received a stamp and die set from Stamps of Life and decided to use them to create a masculine card. This set is called "Lighthouse 2 Stamp" and can be found here.
I started with a piece of white card stock and added the blue print after tearing the edge.
Next I stamped the image and sentiment with Momento Tuxedo black ink and colored the image with markers. I used the matching die to cut out the light house and added it to the front of the card with pop dots. Next I matted the sentiment onto a piece of the blue paper and adhered it with pop dots also. Last I stamped the birds onto the card and added blue and white striped twine.
Now I hope you will stop by the Sisterhood and check out the beautiful inspiration projects by the sistahs. Then enter your project for a chance to be our next Top Winner.
You have until 7pm Sunday  September 1st to enter. Remember there is a limit of 3 entries per person,
Have a wonderful day!
Terri